klipper_canbus
MKS Monster8 v2 as a Can to USB bridge adapter
This is end to end so it’ll include all steps taken after creating a new RaspberryPI OS Lite (32-bit) image and logging into SSH for the first time.
PI Setup
Download and install GIT
sudo apt install git
Download Kiuah and install Klipper,Moonraker,Mainsail/Fluidd
cd ~
git clone https://github.com/th33xitus/kiauh.git
./kiauh/kiauh.sh
Note if running these back to back, kiuah will keep you in the install menu until you exit yourself so you dont need to navigate to/from the main menu each time.
Klipper
From the main menu
1 - [Install]
1 - [Klipper]
2 - [Python 3.x] (experimental)
Number of Klipper instances to set up: 1 and confirm using the Y option
Moonraker
From the main menu
1 - [Install]
2 - [Moonraker]
Confirm using Y
If prompted press Y to add your user to the TTY group
Mainsail/ Fluidd
From the main menu
1 - [Install]
(3 or 4) 3 for [Mainsail] or 4 for [Fluidd]
Follow the prompts
Exit Kiuah B enter then Q enter or just hit CTRL + C
Download CanBoot and install pyserial
cd ~
git clone https://github.com/Arksine/CanBoot
Install pyserial
pip3 install pyserial
Make CanBoot Firmware
cd CanBoot
make menuconfig
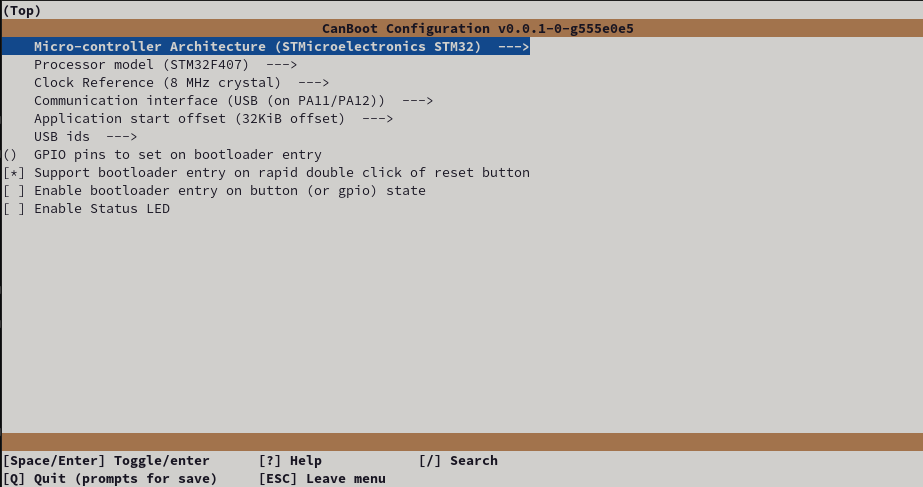
Exit using Q or ESC and confirming changes with Y
Build the firmware (clean)
make clean
make
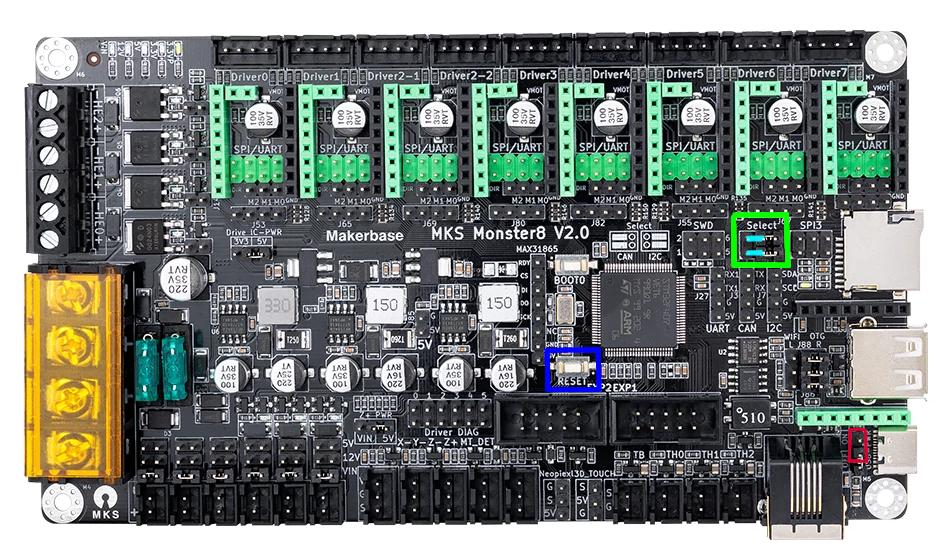
Set jumpers and connect the MKS Monster8 to the PI via USB
Insert the USB power jumper per the red box below
Ensure the SELECT jumpers are in the CAN position (green box, blue lines)
Connect the board to the PI via USB C
You can then hold reset (blue box), hold boot0 (labled above the blue box) and release reset followed by boot0 to enter DFU mode.
Alternativley if your firmware has doulbe press for bootloader enabled, you can use this. or simply hold the Boot0 button while connecting the USB
Verify the device is in DFU mode using
lsusb
You should see a STMicroelectronics STM Device in DFU mode listed

Flash CanBoot
We can now flash the canboot bootloader we created
sudo dfu-util -a 0 -D ~/CanBoot/out/canboot.bin --dfuse-address 0x08000000:force:mass-erase:leave -d 0483:df11
NOTE: If you see an error after the above, don’t worry its fine, provided you have the “File Downloaded Sucessfully” on the line before the error
Verify the CanBoot usb bootloader is loaded (requires double tap of RESET button)
lsusb should show an OpenMoko device stm32f407xx
ls /dev/serial/by-id/ should show a device serial.
both are shown in the below image for reference.

NOTE: the /dev/serial/by-id/usb-CanBoot_stm32f407xx_<NUMBERSHERE>-if00 is needed for the next steps :)
Make Klipper Firmware
cd ~/klipper
make menuconfig
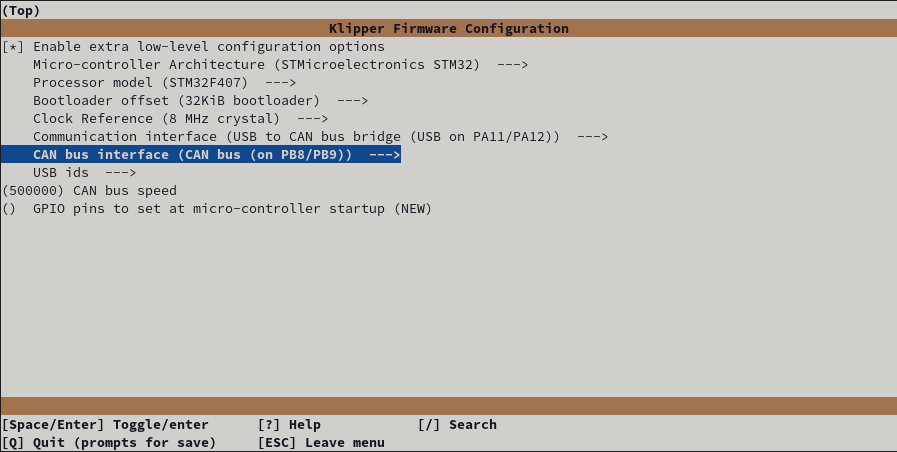
Exit using Q or ESC and confirming changes with Y
make clean
make
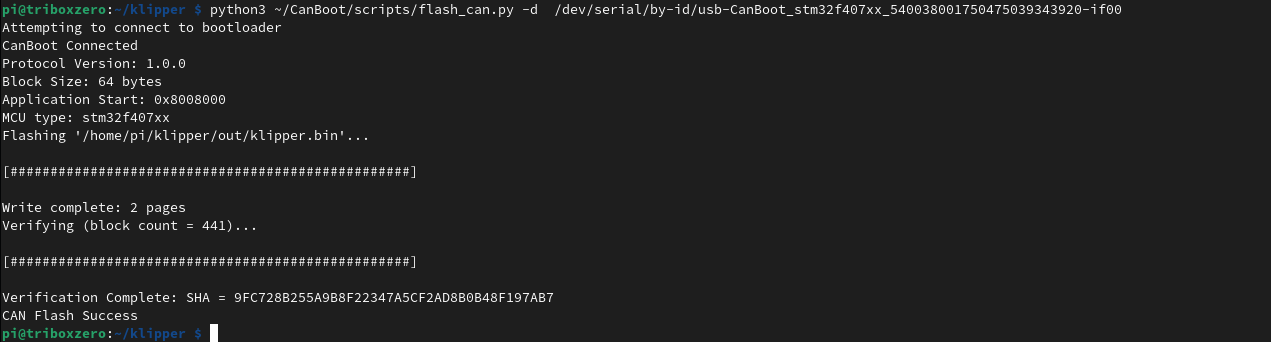
Flash the new firmware via CanBoot
Ensuring that the board is in canboot mode
you can now use the /dev/serial/by-id/usb-CanBoot_stm32f407xx_ line in the following command to flash your board with the klipper firmware.
python3 ~/CanBoot/scripts/flash_can.py -d /dev/serial/by-id/usb-CanBoot_stm32f407xx_<NUMBERSHERE>-if00
Setting up the CAN0 network
This differs slightly as we want to allow hotplug (should help with normal MCU restarts)
sudo nano /etc/network/interfaces.d/can0
allow-hotplug can0
iface can0 can static
 bitrate 500000
 up ifconfig $IFACE txqueuelen 256
 pre-up ip link set can0 type can bitrate 500000
 pre-up ip link set can0 txqueuelen 256
and press Ctrl+X to save.
you can now reboot the pi with ` sudo reboot `
Verify the adapter is seen
lsusb

You can now connect 24V to the board
Verify the “virtual” device is visible
~/CanBoot/scripts/flash_can.py -i can0 -q

(this may say CanBoot dont worry, just note the UUID for the config!)
Check the CAN0 network is up

Wiring a child device
I’m using the RJ12 port with an RJ11 adapter found on ebay for £2-3 with the below setup [mcu] serial: /dev/serial/by-id/usb-Klipper_stm32f446xx_2A0031000B50534E4E313120-if00 restart_method: commandmonster8v2_canwires.png)
Note: it may be possible to use two alternate conifgurations per the pinouts here (https://github.com/makerbase-mks/MKS-Monster8/blob/main/hardware/MKS%20Monster8%20V2.0_003/MKS%20Monster8%20V2.0_003%20PIN.pdf)
- EXT_1 with PA8/PA9
- CAN header TX and RX pins
- Unfortunatley in my own testing I could not get these alternate pins to connect to my EBB36v1.1 board (YMMV)
Success
~/CanBoot/scripts/flash_can.py -i can0 -q

Note: the only configuration changes between CAN and USB for the Monster is to change the [mcu] section from
[mcu]
serial: /dev/serial/by-id/usb-Klipper_stm32f446xx_2A0031000B50534E4E313120-if00
restart_method: command
to
[mcu]
canbus_uuid: <UUID>
restart_method: command
other can devices can be added as secondary MCU’s using the example configs found here.